TL;DR
Moving your rig into a closet or small room can drastically cut noise and reflections—if you treat key reflection points and ensure proper airflow. Placement and ventilation are more impactful than foam alone, and DIY solutions work well with some planning.
Ever wonder why your noisy rig sounds so much better in a closet or tiny room? It’s not just about stuffing foam panels everywhere. The real magic happens when you understand where sound bounces, how to dampen reflections, and how to keep your equipment cool without turning your closet into a sauna.
This guide cuts through the noise—literally—showing you how to turn a cramped space into a quiet, effective workspace. Whether you’re recording vocals, running AI inference rigs, or just want peace and quiet, these tips will help you get the most out of your small setup.
Acoustic dampening
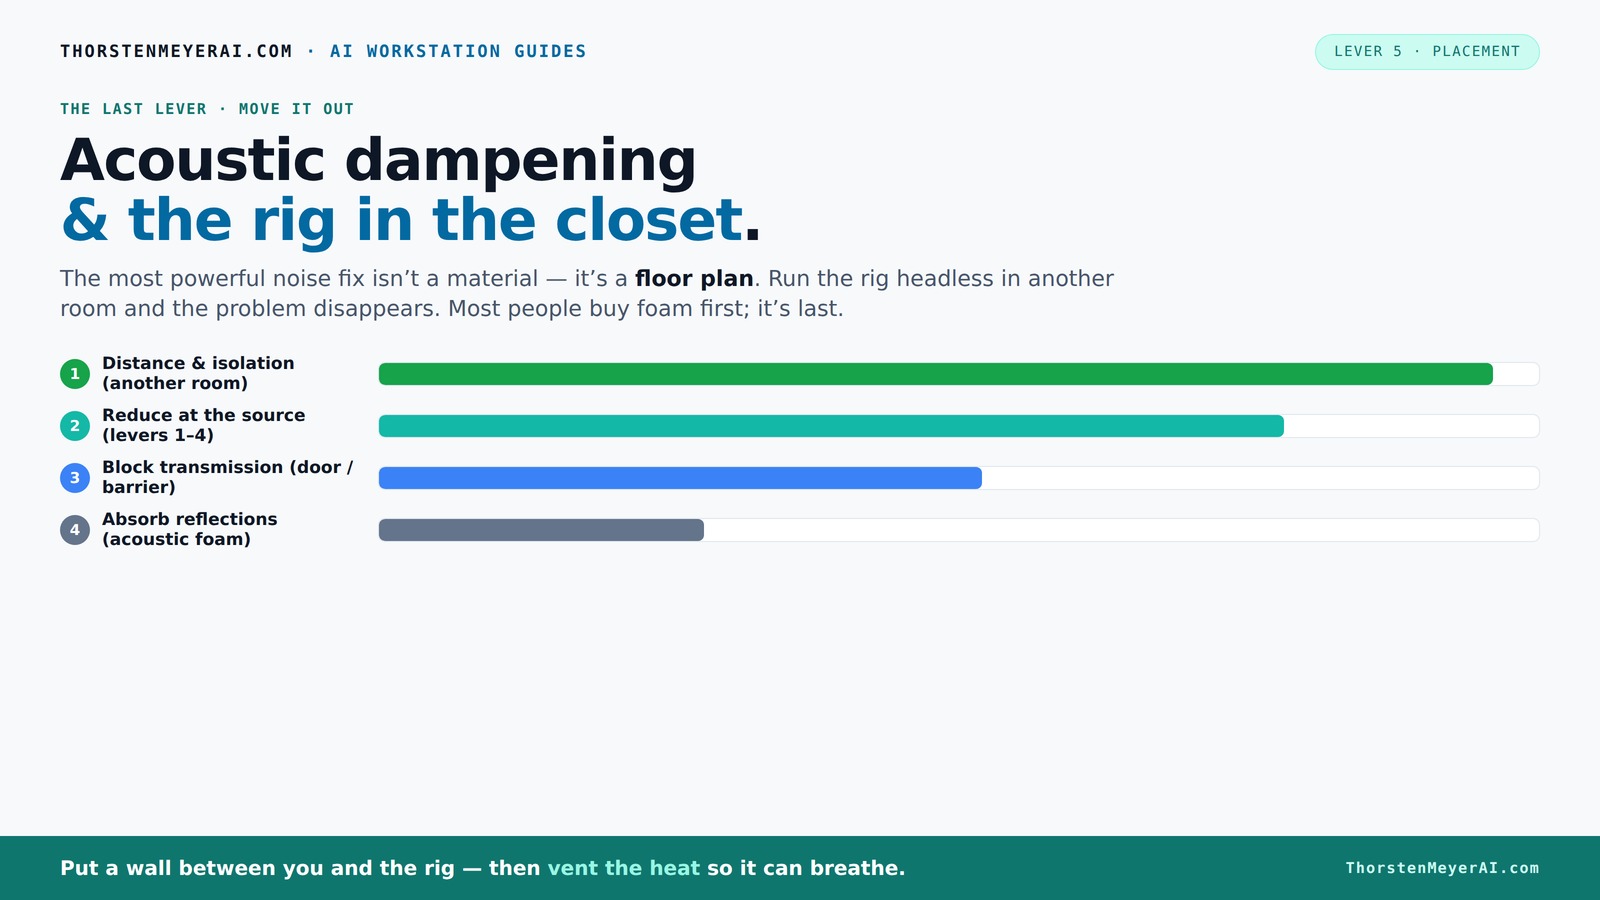
& the rig in the closet.
The most powerful noise fix isn’t a material — it’s a floor plan. A rig you can’t hear because it’s in another room beats any amount of foam. Tap the approaches in Part 1 to see what actually works.
(another room)
(levers 1–4)
(door / barrier)
(acoustic foam)
Contain the noise, not the heat
Key Takeaways
- Moving your rig into another room is the most effective way to cut noise—no treatment needed if you can do this. Learn more about acoustic dampening and placement techniques.
- Target reflection points with soft, dense materials like blankets and foam for the biggest reduction in echo and flutter. For detailed tips, see this guide on acoustic dampening.
- Sealing gaps around the door and vents is critical—sound leaks through even tiny cracks. Check out how to improve your room's acoustics for more info.
- Place bass traps in corners to reduce low-frequency muddiness in small enclosures. For more on effective bass trapping, visit this article on bass trapping.
- Ensure your closet rig has proper airflow; exhaust fans and vents prevent heat buildup and noise from throttling the system. Learn about airflow and acoustic management for quiet operation.
soundproof closet panels
As an affiliate, we earn on qualifying purchases.
As an affiliate, we earn on qualifying purchases.
Why Moving Your Rig Is the Best Noise Solution, Hands Down
Moving your noisy machine into another room is the simplest, most effective way to cut sound. Think of it like putting a wall between you and the noise. When your rig is physically distant, sound waves dissipate over distance, reducing the volume and impact of the noise you hear. This spatial separation minimizes not just direct noise but also reduces the reflections bouncing back into your workspace, which can cause echo and muddiness. The tradeoff? You lose some proximity for your microphone or speakers, so you'll need to compensate with placement and treatment if you want optimal sound quality.
For an AI setup, you don’t even need the machine in the same room. You can SSH or use a networked API—your laptop or workstation remains quiet while the rig roars in the closet or basement. Just remember: good network and ventilation are key. This approach allows you to isolate noise sources without sacrificing accessibility or performance.
Imagine your GPU mining or crunching data at full throttle. If it’s in a closet, your ears won’t hear a thing. But heat management becomes critical—more on that in the next section. The key insight is that physical separation is often the most straightforward, yet most impactful, method to control noise, especially in shared environments or apartments.
acoustic foam panels for recording
As an affiliate, we earn on qualifying purchases.
As an affiliate, we earn on qualifying purchases.
How to Use a Closet for Your Rig Without Turning It Into an Oven
Placing a hot, high-power machine in a closet is a smart move but has its pitfalls. The biggest danger? Heat buildup. When your equipment operates in a sealed or semi-sealed space, heat accumulates because hot air rises and cannot escape efficiently. This can lead to thermal throttling—a safety feature where the system reduces performance to prevent overheating—and increased fan noise as fans work harder to cool the hardware. The consequence? Not only does this diminish performance, but it also introduces more noise into your environment.
To keep your rig cool and quiet, you need to establish effective airflow pathways. Think of it like a chimney—hot air rises naturally, so designing for passive vents at the top and intake vents at the bottom allows for continuous airflow. Installing a quiet exhaust fan that pulls hot air out without creating additional noise is a common solution. Consider using ducting to direct airflow, which can improve cooling efficiency and minimize noise transmission. The tradeoff here is between complexity and effectiveness; simple passive vents are easy but less efficient, while active ventilation with ducting and fans requires planning but yields better thermal management and quieter operation.
For serious silence and cooling, a purpose-built soundproof cabinet with ducted airflow is the gold standard. These units combine insulation, acoustic foam, and quiet, brushless fans to dissipate heat while keeping noise levels minimal. Check out the low-noise PC case airflow guide for ideas. Remember, proper ventilation isn't just about cooling; it directly impacts noise levels and hardware longevity. Ensuring your setup has designated intake and exhaust paths, combined with soundproofing, strikes a balance between thermal safety and acoustic comfort.
portable soundproof room divider
As an affiliate, we earn on qualifying purchases.
As an affiliate, we earn on qualifying purchases.
The Art of Acoustic Dampening: Where to Treat and Why It Matters
Acoustic dampening isn’t about sealing every crack. It’s about understanding how sound interacts with your space—particularly the reflection points that cause echo and muddiness. These are typically behind the mic, on the ceiling, the door, and in the corners where sound waves tend to accumulate and bounce repeatedly. Targeting these areas with absorbent materials reduces the overall reverberation, leading to clearer recordings and less ambient noise in your workspace.
Think of sound like water bouncing off surfaces. Soft, dense materials like blankets, foam panels, and carpets absorb these reflections, preventing them from bouncing back into your microphone or ears. For example, draping a thick blanket over the closet door can cut 30-50% of sound leakage and flutter echo. The key is to strategically place these materials at the reflection points, rather than covering every surface, which can be unnecessary and reduce space usability.
Bass traps are crucial because low frequencies tend to sink into corners, causing a boomy, boxy sound that masks clarity. Properly placed bass traps—thick, dense panels glued into the corners—can reduce low-end muddiness by up to 50%, significantly improving the transparency of your recordings. Without addressing bass frequencies, your sound may remain muddy and undefined, regardless of high-frequency treatments.
In a DIY setup, combining blankets, foam panels, and rugs at reflection points creates an effective, low-cost solution. For a more permanent installation, consider adding insulation behind panels and sealing gaps around the door and vents to prevent sound leaks. Understanding the physics of sound and reflection helps you target the most impactful areas, making your dampening efforts more efficient and effective.
ventilation fan for small recording space
As an affiliate, we earn on qualifying purchases.
As an affiliate, we earn on qualifying purchases.
Placement Tricks to Maximize Sound Dampening and Minimize Reflections
Your mic placement is crucial because it directly influences the quality of your recordings by controlling how much reflected sound reaches the capsule. Position your microphone at the reflection point—roughly 6-12 inches from the wall behind it—to reduce the amount of sound bouncing back into the capsule. Using a reflection filter further helps by acting as a mini shield, absorbing and deflecting unwanted reflections before they reach the mic. This setup minimizes echo and flutter, resulting in cleaner, more focused recordings.
For your equipment, avoid placing the rig directly against the wall or in corners where low-frequency buildup is most likely. Instead, set it on rubber feet or mounts that decouple it from the surface, thereby reducing structure-borne hum and vibrations that can turn into noise. Decoupling prevents vibrations from transferring into your microphone or speakers, which can cause low-frequency rumble or buzzing that’s hard to eliminate later.
For example, positioning your desktop mic boom at a 45-degree angle to the sound source helps reduce reflections and captures a more direct sound. Similarly, placing your computer on a rubber pad or isolated stand prevents vibrations from transferring into the computer case, which can cause audible hum or mechanical noise. Additionally, sealing gaps around the door’s edges with weatherstripping or acoustic sealant prevents sound leaks—tiny cracks can transmit significant noise, so sealing them effectively cuts noise transmission in half or more.
These placement and sealing strategies are about controlling the environment at a micro level, which cumulatively results in a significant improvement in sound clarity and noise reduction. Thoughtful positioning minimizes the need for excessive treatment and helps you achieve professional-quality sound in a small, confined space.
DIY Materials and Tricks for a Sound-Absorbing Closet Setup
You don’t need fancy gear to turn a closet into a decent studio or quiet workspace. Common household items work wonders. Think blankets, foam panels, rugs, and even thick curtains. These materials are effective because they absorb sound waves at various frequencies, especially when placed at reflection points and in corners where low frequencies tend to accumulate.
For example, hanging moving blankets over a closet door and walls can reduce echo by 40-60%. Adding a rug on the floor cuts down floor reflections and footstep noise, which can otherwise muddy recordings. Use foam panels or even egg crate foam strategically at reflection points to absorb high frequencies and flutter echoes. Sealing gaps around the door with weatherstripping or acoustic sealant prevents sound leaks, which is critical for maintaining a quiet environment.
For low frequencies, bass traps are essential. These are dense, thick panels placed in corners to trap and absorb low-end sound waves, preventing them from sinking into the space and causing muddiness. DIY bass traps can be made from dense mineral wool or fiberglass panels wrapped in fabric, then glued into the corners.
DIY tricks include mounting foam on cardboard, hanging blankets from curtain rods, or stacking dense materials in corners. These solutions are modular, removable, and affordable—perfect for temporary setups or renters. The key is understanding which areas are reflection hotspots and addressing those with accessible, household materials for a surprisingly professional result.
The Final Word: Balance Dampening, Placement, and Ventilation for Perfect Results
Effective sound control in a small space requires a holistic approach. It’s not enough to just throw foam everywhere; you need to understand where reflections occur, how sound leaks through gaps, and how to keep your equipment cool. Targeted dampening at reflection points reduces echo, while sealing gaps around the door and vents prevents sound from escaping or entering. Proper ventilation ensures your rig remains cool, preventing thermal throttling and noise from fans working overtime.
Moving your rig away from your workspace remains the most straightforward and impactful method to cut noise. But in smaller spaces, combining this with strategic treatment—placing bass traps in corners, treating reflection points, and sealing gaps—creates a balanced environment. This holistic approach minimizes noise, reduces echo, and maintains hardware performance.
If you combine good placement, targeted treatment, and proper ventilation, you’ll transform a cramped closet into a quiet, professional-sounding space—ideal for recording or AI rigs without disturbing others. The key is understanding the physics of sound and applying it thoughtfully, rather than relying solely on foam or other single solutions.
Frequently Asked Questions
Can a closet really work as a vocal booth or recording space?
Yes. With proper treatment—adding blankets, foam, and sealing gaps—it can become a surprisingly effective vocal booth. Just remember to treat reflection points and consider ventilation for comfort.What is the difference between soundproofing and acoustic treatment?
Soundproofing blocks sound from leaking out or coming in, usually by sealing gaps and adding mass. Acoustic treatment reduces echo and reflections inside a space, making recordings clearer but doesn’t block sound transmission.Should I use foam panels, moving blankets, or acoustic panels?
All can work, but moving blankets are a budget-friendly DIY option that’s surprisingly effective. Foam panels are good for targeted reflection points, while professional acoustic panels offer more precise control.Where should I place treatment for best results?
Focus on reflection points behind the mic, ceiling, door, and corners. Use a mirror trick—place a mirror on the wall and see where the sound reflects back to your mic to identify key spots.Do I need bass traps in a closet?
Absolutely. Low frequencies tend to sink into corners and cause muddiness. Bass traps help tighten up the sound and improve clarity, especially in small, enclosed spaces.Conclusion
Don’t fall into the trap of thinking foam is the magic fix. The real power lies in where you place your gear, how you block sound leaks, and making sure your rig stays cool. For a quiet, effective setup, treat your space thoughtfully, and move your noise source out of sight—and earshot.
Imagine a tiny closet transformed from a boomy, echo chamber into a silent, professional-sounding space. That’s the power of strategic placement, smart dampening, and ventilation. Your setup’s silence can be just as impressive as its power.